Smart Home with Flutter
Flutter is a new mobile development SDK brought to you by Google to help you build fast, beautiful, and cross-platform mobile applications for iOS and Android, from a single codebase. It uses a new language called Dart. Dart is majorly influenced by languages like JavaScript and Java. This helps in reducing the learning curve significantly.
This tutorial will walk you through the process of building a simple Layout with Flutter.
This project is a starting point for a Flutter application.
Prerequisites
You can start flutter if you have experience in the following categories:-
- If you have worked with Android or iOS native or React Native or Xamarin or Ionic or another mobile development framework
- If you have knowledge about Dart language
- If you have worked with Object Oriented Languages such as Java, C++ and I’m comfortable with OOP concepts such as Classes, Objects, Methods
Installation
1. Configuring
After installing a few light-weight plugins, you can use Android Studio, the IDE native Android app developers are most accustomed to, to develop Flutter apps.
Start by launching Android Studio and choosing the Configure > Plugins option in the welcome screen.
In the dialog that pops up, press the Browse Repositories button and search for the Flutter plugin.
2. Creating a New Project
After the restart, you’ll be able to see a Start a new Flutter project button on the Android Studio in the welcome screen. Press it to start creating your first Flutter project.
On the next screen, choose the Flutter Application option and press Next.
You’ll now see a form asking for various details about your Flutter application, such as its project name and file location.
Once you are ready you can run the following command to make sure setup is done.
-flutter doctor
now, you will get the output.
In this tutorial, we will see how to write code in main.dart file. By default, it contains some sample code, delete all the contents.
Now, add the following code in your app.
import 'package:flutter/material.dart';

void main() async => runApp(SmartHomePage());
Next, to apply Material Design styling to your widgets, you must have a MaterialApp widget.
A widget is either stateful or stateless. If a widget can change—when a user interacts with it, it’s stateful.
A stateless widget never changes.Icon, IconButton, and Text are examples of stateless widgets. Stateless widgets subclass StatelessWidget.
You can hot reload to run the app instantly.
class SmartHomePage extends StatelessWidget {

@override

Widget build(BuildContext context) {

  return new MaterialApp(

    title: "SmartHome",
  );
 }
}
Now, your app should look much better now with Material Theme.
You can see debug label in the right corner of the screen, you can remove that by this,
class SmartHomePage extends StatelessWidget {

 @override

Widget build(BuildContext context) {

  return new MaterialApp(

    title: 'SmartHome',

    debugShowCheckedModeBanner: false,

    theme: new ThemeData(

     primarySwatch: Colors.blue,
    )
 }
}
Now, add AppBar to the App.
class SmartHomePage extends StatelessWidget {
@override
Widget build(BuildContext context) {
return new MaterialApp(
title: 'SmartHome' theme: new ThemeData(
primarySwatch: Colors.blue,
),
home: Scaffold(
appBar: AppBar(
title: Text("Kitchen"),
),
backgroundColor: Color(0xFF32323e),
body: Padding(
padding: const EdgeInsets.symmetric(horizontal: 16.0),
)),
);
}
}
3. Creating Widgets
If you want to add Text, you can just add :
Text text = Text(“text”);
If you want to display an image instead of text, you can simply replace the Text widget with an Image widget inside your class’s build() method. The following code shows you how to create an Image widget that downloads and displays a remote image:
Image image = Image.network(url);
To learn more about widgets in Flutter, do refer to the official documentation.
In this project, we have used some FontAwesome icons, for that you will need to add the dependency.
Add the following line in pubspec.yaml file
font_awesome_flutter: ^8.2.0
Code Editor
If you are an Android Developer, you can start with Android Studio with same keymap settings you have used in developing Android apps or you can use VS Code as code editor. VS Dart Code extension has some really nice development features.
Getting Started
Clone or Fork Project to get started.
Make sure to complete flutter installation
After successfully run this, your app will look like this.
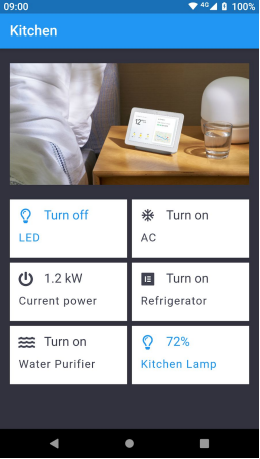
Conclusion
Now, you know how to start the Flutter project, You also learned how to apply a Material Design theme.
Flutter apps often run at close to 60 fps and feel very fluid and responsive.