Notekeeper Application Using Flutter
Flutter is an open-source cross-platform mobile development framework developed by Google. Apps for which are written in Dart. Flutter comes pre-equipped with Material Design components which makes it easy to create apps with good look and feel. In Flutter everything is a Widget of either stateless or stateful.
Summary:
- This blog is a walkthrough of the process to make a NOTE-KEEPING application using Flutter. To Start off, we will be learning some basics fundamentals of Flutter.
- Here we will understand step by step guide of this process. And at the end will see working example for the same.
Prerequisites:
- If you have worked with Android or iOS native or React Native or Xamarin or Ionic or another mobile development framework
- If you have knowledge about Dart language
- If you have worked with Object Oriented Languages such as Java, C++ and I’m comfortable with OOP concepts such as Classes, Objects, Methods
Installations:
Install Visual Studio Code
Install the Flutter and Dart plugins
- Start VS Code.
- Invoke View > Command Palette….
- Type “install”, and select Extensions: Install Extensions.
- Type “flutter” in the extensions search field, select Flutter in the list, and click install. This also installs the required Dart plugin.
Validate your setup with the Flutter Doctor
- Invoke View > Command Palette….
- Type “doctor”, and select the Flutter: Run Flutter Doctor.
- Review the output in the OUTPUT pane for any issues.
Next Step
Creating the app
- Invoke View > Command Palette.
- Type “flutter”, and select the Flutter: New Project.
- Enter a project name, such as Flutter_Demos, and press Enter.
- Create or select the parent directory for the new project folder.
- Wait for project creation to complete and the main.dart file to appear.
-flutter doctor
Why SQLite?
Our Example
- The app has two separate screens: a note_list and a note_detail (represented by the NoteList and NoteDetail respectively).
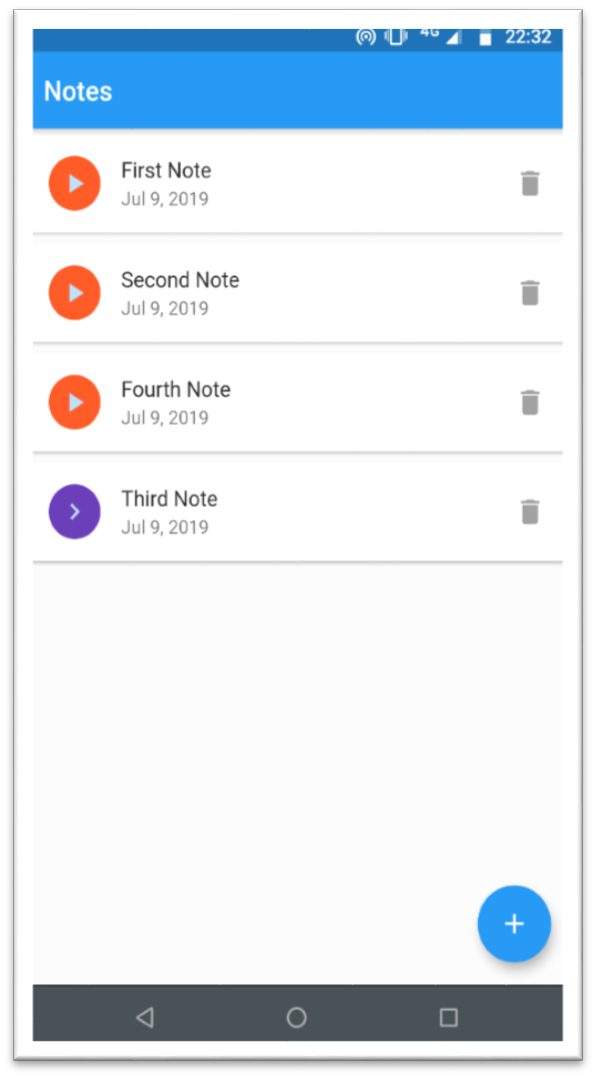
- The note_list screen includes a custom app bar and a scrolling view of many list items. It also include a floating action button to add a new note in the list.
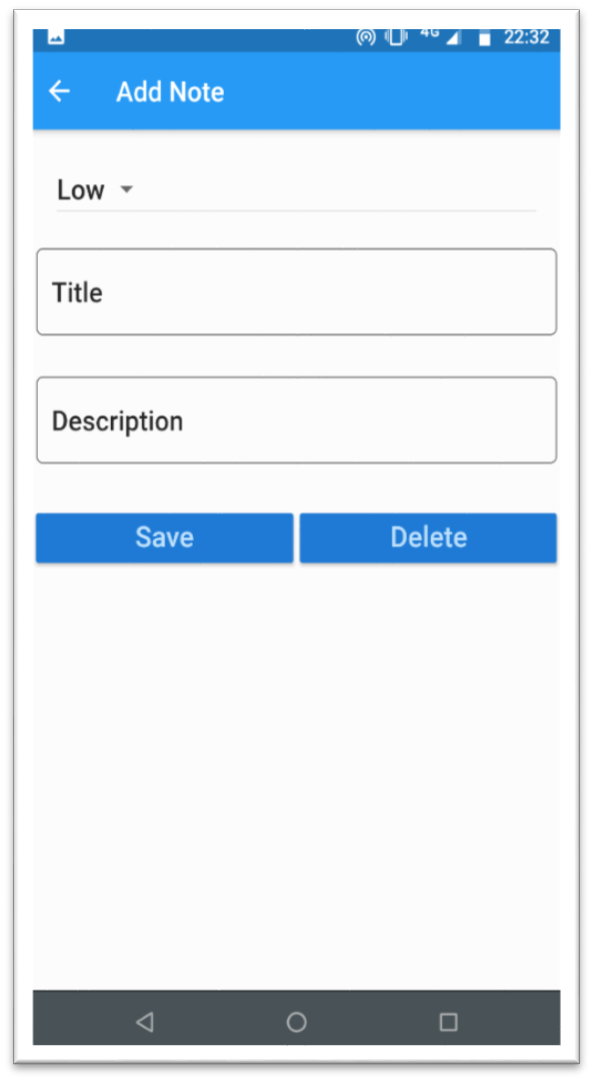
- The note_detail screen includes the detail of the node to be created. It includes the priority order of the note to be created and the title and description of the note.
- The app has a database_helper class which includes all details of the operations performed in backend database.
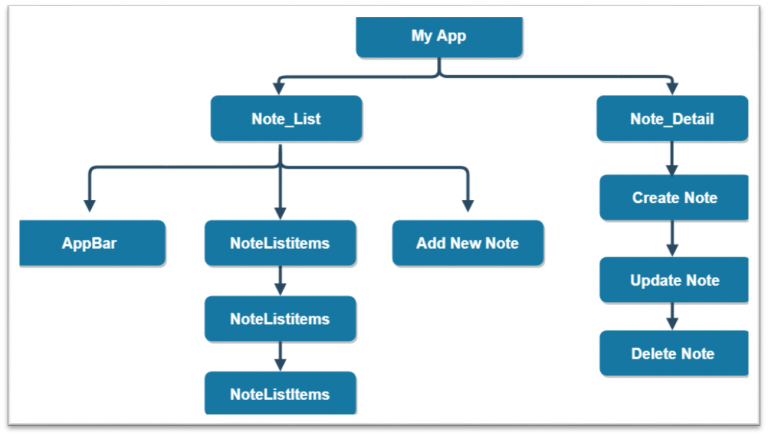
Here’s the app visualized as a widget tree
- Following is a code snippet from pubspec.yaml with the required dependencies listed. Add them, save the file and use flutter command “flutter packages get” to resolve the newly added dependencies. You can get the latest version from pub.
dependencies:
flutter:
sdk: flutter
sqflite: latest
path_provider: latest
intl: latest
NOTE: We use the path_provider package to get the commonly used location such as TemporaryDirectory and ApplicationDocumentsDirectory.
- A Model class
- A Database Helper class
- Create a Singletons objects for database as well as database helper class.
- Write code for performing the insert, update, fetch and delete operations.
class Note {
int _id;
String _title;
String _description;
String _date;
int _priority;
Note(this._title, this._date, this._priority, [this._description]);
Note.withId(this._id, this._title, this._date, this._priority, [this._description]);
int get id => _id;
String get title => _title;
String get description => _description;
int get priority => _priority;
String get date => _date;
set title(String newTitle) {
if (newTitle.length <= 255) {
this._title = newTitle;
}
}
set description(String newDescription) {
if (newDescription.length <= 255) { this._description = newDescription; } } set priority(int newPriority) { if (newPriority >= 1 && newPriority <= 2) {
this._priority = newPriority;
}
}
set date(String newDate) {
this._date = newDate;
}
// Convert a Note object into a Map object
Map<String, dynamic> toMap() {
var map = Map<String, dynamic>();
if (id != null) {
map['id'] = _id;
}
map['title'] = _title;
map['description'] = _description;
map['priority'] = _priority;
map['date'] = _date;
return map;
}
// Extract a Note object from a Map object
Note.fromMapObject(Map<String, dynamic> map) {
this._id = map['id'];
this._title = map['title'];
this._description = map['description'];
this._priority = map['priority'];
this._date = map['date'];
}
} Further, after creating the model class, we have created the DatabaseHelper class. Import the required packages for the DatabaseHelper class, also import the package note.dart.
Then we will have to create the single object of the class. Singleton instance of the class means the instance will be initialized only once throughout our application.
Now we will write the code for creating the database and perform various operations like Insert, Update, Delete & Fetch.
import 'package:sqflite/sqflite.dart';
import 'dart:async';
import 'dart:io';
import 'package:path_provider/path_provider.dart';
import 'package:flutter_app/models/note.dart';
class DatabaseHelper {
static DatabaseHelper _databaseHelper; // Singleton DatabaseHelper
static Database _database;
// Singleton Database
String noteTable = 'note_table';
String colId = 'id';
String colTitle = 'title';
String colDescription = 'description';
String colPriority = 'priority';
String colDate = 'date';
DatabaseHelper._createInstance(); // Named constructor to create instance of
DatabaseHelper
factory DatabaseHelper() {
if (_databaseHelper == null) {
_databaseHelper = DatabaseHelper._createInstance(); // This is executed only once,
singleton object
}
return _databaseHelper;
}
Future get database async {
if (_database == null) {
_database = await initializeDatabase();
}
return _database;
}
Future initializeDatabase() async {
// Get the directory path for both Android and iOS to store database.
Directory directory = await getApplicationDocumentsDirectory();
String path = directory.path + 'notes.db'; Now let us connect our database with our UI.
Let us first import all the packages for our note_list.dart file and do the same for the note_detail.dart file.
For the NoteList which will be used for displaying the list of the notes.
import 'dart:async';
import 'package:flutter/material.dart';
import 'package:flutter_app/models/note.dart';
import 'package:flutter_app/utils/database_helper.dart';
import 'package:flutter_app/screens/note_detail.dart';
import 'package:sqflite/sqflite.dart';
The sample code for the above description is as follows:
Click here to access the full code.
class NoteList extends StatefulWidget {
@override
State createState() {
return NoteListState();
}
}
class NoteListState extends State {
DatabaseHelper databaseHelper = DatabaseHelper();
List noteList;
int count = 0;
@override
Widget build(BuildContext context) {
if (noteList == null) {
noteList = List();
updateListView();
} import 'package:flutter/material.dart'; import 'package:flutter_app/models/note.dart'; import 'package:flutter_app/utils/database_helper.dart'; import 'package:intl/intl.dart';
class NoteDetail extends StatefulWidget {
final String appBarTitle;
final Note note;
NoteDetail(this.note, this.appBarTitle);
@override
State createState() {
return NoteDetailState( this.note , this.appBarTitle);
}
} import 'package:flutter/material.dart';
import 'package:flutter_app/screens/note_list.dart';
void main() {
runApp(MyApp());
}
class MyApp extends StatelessWidget {
@override
Widget build(BuildContext context) {
return MaterialApp(
title: 'NoteKeeper',
debugShowCheckedModeBanner: false,
theme: ThemeData(
primarySwatch: Colors.blue
),
home: NoteList(),
);
}
}