Connecting Web page to AWS with API Gateway and Dynamo DB
1. Introduction:
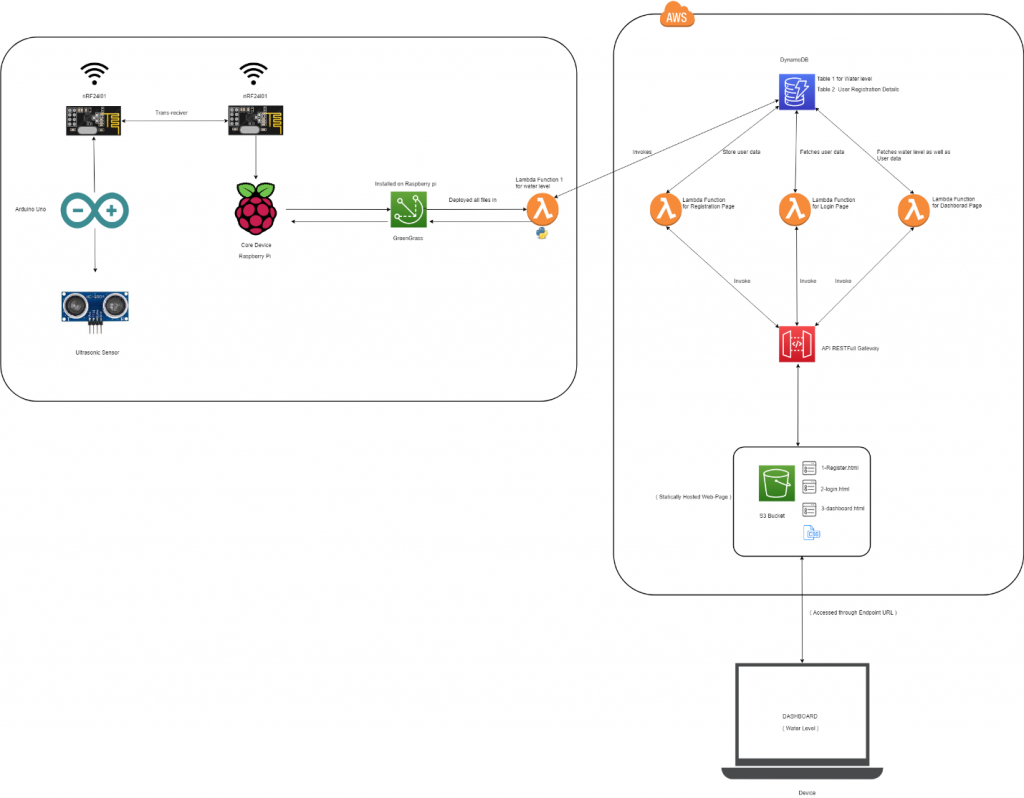
- In this blog firstly you’ll use AWS Lambda and Amazon DynamoDB to build a backend process for handling requests for your web application the browser application that you deployed in the previous blog allows the user to register and login to their dashboard.
- Details filled in Registration page will be stored in DynamoDB using
- API gateway and in Login Page details entered are matched with the data inside the database.
API Gateway is like a tunnel between webpage and dynamo DB which helps in communicating with each other.
2. Build a serverless backend:
- You’ll implement a Lambda function that will be invoked each time a user requests for the registration page. The function will take data from the registration page and store it in a DynamoDB table and then respond to the front-end application when the same user tries to login and then it is redirected towards Dashboard with details.
- The function is invoked from the browser using Amazon API Gateway. You’ll implement that connection in the later section of the blog.
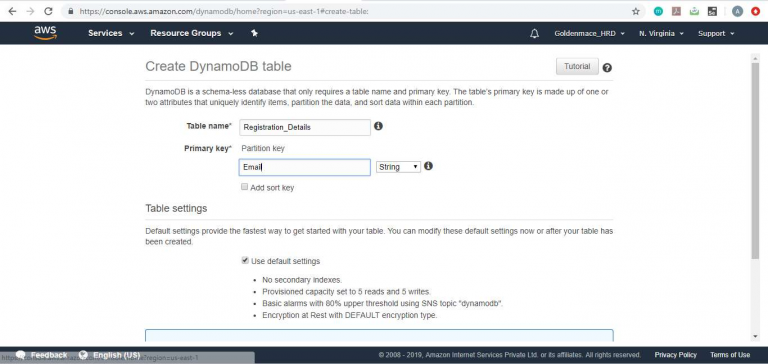
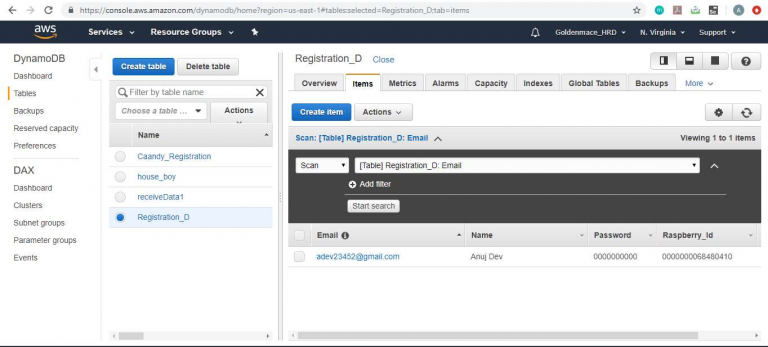
Step1: Create an Amazon DynamoDB Table
Step2: Create a Lambda Function for Handling Requests
- AWS Lambda will run your code in response to events such as an HTTP request. In this step you’ll build the core function that will process API requests from the web application to registration .In the later section you’ll use Amazon API Gateway to create a RESTful API that will expose an HTTP endpoint that can be invoked from your users’ browsers. You’ll then connect the Lambda function you create in this step to that API in order to create a fully functional backend for your web application.
- Use the AWS Lambda console to create a new Lambda function called Registration that will process the API requests. Just copy and paste below code into the AWS Lambda console’s editor.
https://github.com/twowords-io/SmartWaterManagement
3. Deploy a RESTful API
- In this section you’ll use Amazon API Gateway to expose the Lambda function you built in the previous module as a RESTful API. This API will be accessible on the public Internet. Using this configuration, you will then turn your statically hosted website into a dynamic web application by adding client-side JavaScript that makes AJAX calls to the exposed APIs.
- This module will focus on the steps required to build the cloud components of the API, but if you’re interested in how the browser code works that calls this API, you can inspect the html files of the website. In this case the application uses jQuery’s ajax() method to make the remote request.
Further, after creating the model class, we have created the DatabaseHelper class. Import the required packages for the DatabaseHelper class, also import the package note.dart.
Then we will have to create the single object of the class. Singleton instance of the class means the instance will be initialized only once throughout our application.
Now we will write the code for creating the database and perform various operations like Insert, Update, Delete & Fetch.
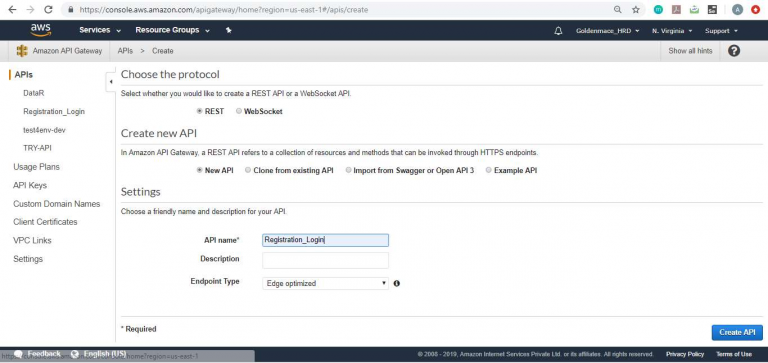
Step1: Create a New REST API
a. In the AWS Management Console, click Services then select API Gateway under Application Services.
b. Choose Create API.
c. Select New API and enter Registration_API for the API Name.
d. Keep Edge optimized selected in the Endpoint Type dropdown.
Note: Edge optimized are best for public services being accessed from the Internet. Regional endpoints are typically used for APIs that are accessed primarily from within the same AWS Region.
e. Choose Create API
Step2: Create a new resource and method
a. In the left nav, click on Resources under your Registration_Login API
b. From the Actions dropdown select Create Resource.
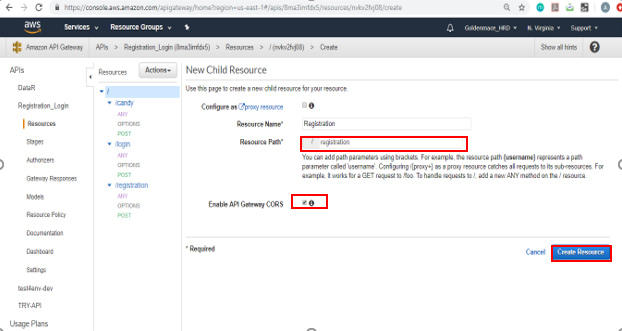
c. Enter Registration as the Resource Name.
d. Ensure the Resource Path is set to Registration.
e. Select Enable API Gateway CORS for the resource.
f. Click Create Resource.
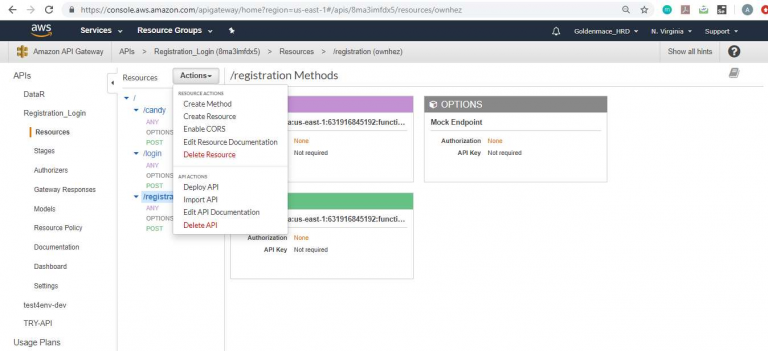
g. With the newly created / Registration resource selected, from the Action dropdown select Create Method.
h. Select POST from the new dropdown that appears, then click the checkmark.
i. Select the Lambda Function for the integration type.
j. Check the box for Use Lambda Proxy integration.
k. Select the Region you are using for Lambda Region.
l. Enter the name of the function you created in the previous module, Registration Lambda, for Lambda Function.
m. Choose Save. Please note, if you get an error that your function does not exist, check that the region you have selected matches the one you used in the previous module.
n. When prompted to give Amazon API Gateway permission to invoke your function, choose OK.
Step3: Deploy Your API
a. In the Actions drop-down list select Deploy API.
b. Select [New Stage] in the Deployment stage drop-down list.
c. Enter Development for the Stage Name.
d. Deploy.
e. Note the Invoke URL. You will use it in the next section.