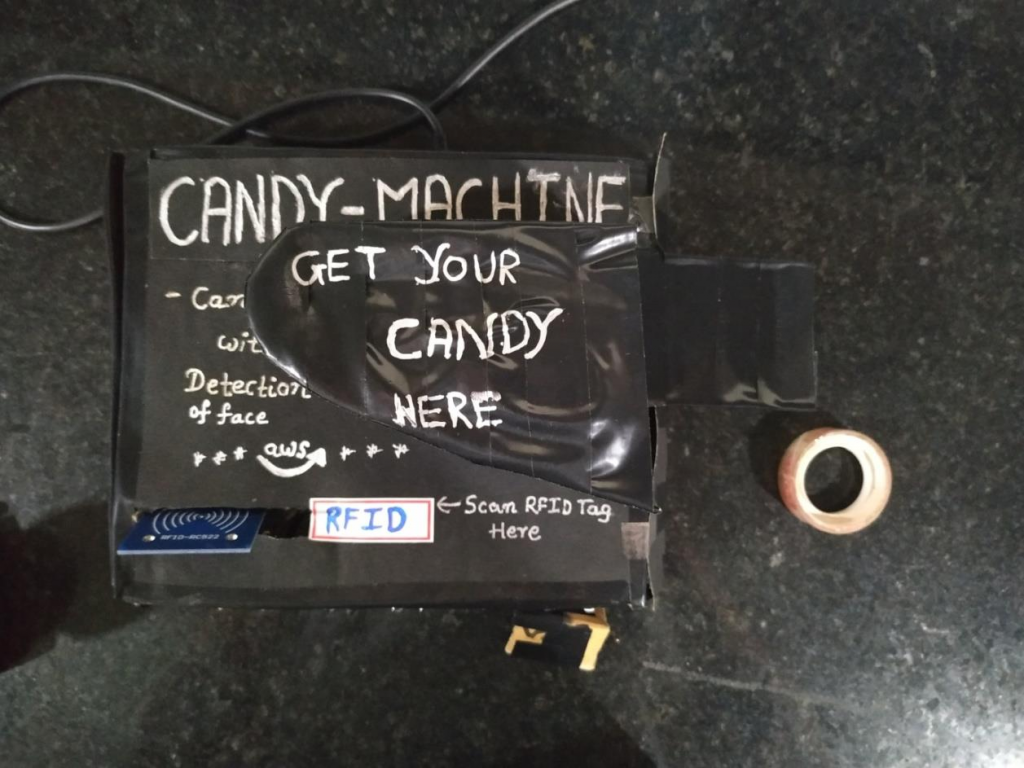
CANDY DISPENSER WITH EMOTION DETECTION
1. Overview:
2. The System demo as below:
3. Requirements:
- AWS Rekognition, AWS Lambda , AWS IoT- Core services
- Installing Open-CV and Flask
- Python coding with Open-CV and Flask in python on AWS Lambda
- Raspberry-pi with camera module or webcam
- RFID reader and tags and LED’S
4. Pre-requisite basic knowledge in concepts like:
- AWS account to get access to the AWS services
- Python installing and Basic knowledge in Python coding
- Flask in Python
- Open-CV in Python
- RFID reader and tags and LED’S
5. Hardware set-up for the system:
- Raspberry-pi (Heart of system)
- The list of devices to connect with the Raspberry-pi with best tutorial links
below:-
- Webcam or raspberry-pi camera
(Here we have used a USB webcam for connecting it with the raspberry-pi camera) - RFID reader and Tags
(https://medium.com/coinmonks/for-beginners-how-to-set-up-a-raspberry-pi-rfid-
rc522-reader-and-record-data-on-iota-865f67843a2d) - Push Button and LED’S
(https://www.hackster.io/hardikrathod/push-button-with-raspberry-pi-6b6928) - MG90S or SG90S motor
(https://www.instructables.com/id/Servo-Motor-Control-With-Raspberry-Pi/)
Before moving to the Implementation of the system you need to learn about the AWS services like AWS Lambda, AWS Dynamo-DB, AWS Rekognition , AWS IoT-core so that you can get the idea of using the services for setting up wonderful software part of this system hence refer this additional link below and get ready:-
- https://gist.github.com/alexcasalboni/0f21a1889f09760f8981b643326730ff
(Repository of API for AWS Emotion Recognition service). - https://docs.aws.amazon.com/iot/latest/developerguide/register-device.html
(Guide to register raspberry pi on AWS IoT core.) - https://docs.aws.amazon.com/iot/latest/developerguide/iot-lambda-rule.html
(Guide to create a rule on AWS IOT core to trigger lambda function on MQTT
publish) - https://www.edureka.co/blog/amazon-dynamodb-tutorial
(Guide to help to work with the AWS Dynamo-DB and link to use it with your
registration form further)
6. Software set-up with Implementation of system:
How it works:-
- First, it waits for scanning RFID card by the user. When RFID card is detected it is verified with the card registered in DynamoDB.
- It will take the picture of the person’s expression and send it to a bunch of AWS services to detect the emotion.
- Once an emotion is detected it will blink the concerned LED and rotate the servo motor to dispense the candy.
6.1 Registering RFID card.
6.1.1 Data flow diagram is as follow:-
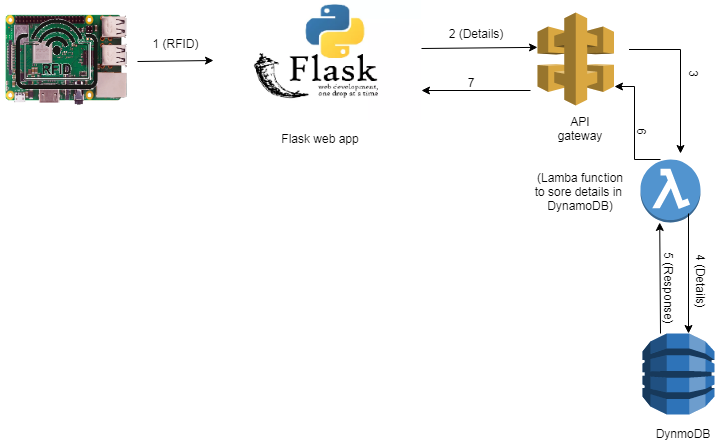
- Raspberry Pi keeps listening for RFID card.
- The serial number of detected RFID card is passed to the Registration page in Flask using AJAX.
- When a user clicks on sign up button lambda function is invoked using API gateway with AJAX.
- Lambda function receives the Registration details from a webpage through API gateway.
- Lambda function stores this details in AWS Dynamo-DB.
6.1.2 Making of Registration architecture:
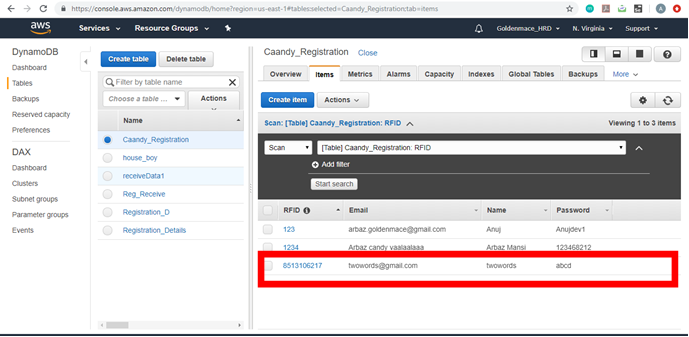
1. Setting up Dynamo-DB
On AWS, the first table is created in Dynamo-DB.
Use the Amazon Dynamo-DB console to create a new Dynamo-DB table. Give your table
name and partition key called RFID with type String. The table name and partition key are
case sensitive. The table has 2 other fields name and mail.
2. Lambda function to store data in Dynamo-DB
Following is code to store data in Dynamo-DB:-
tableName = "Caandy_Your tablename"
table = dynamodb.Table(tableName)
table.put_item(
  Item={
    'RFID':event['RFID'],
    'Name':event['Name'],
    'Email':event['Email']
  }
) 3. API gateway for the above lambda function.
API gateway must be created to invoke lambda function.
(Note: Link to create API gateway for AWS lambda function:-
https://docs.aws.amazon.com/apigateway/latest/developerguide/getting-started-with-lambda-integration.html )
4. Creating Flask app on raspberry pi
Create a route to a function (in main.py) which keeps scanning for RFID card. This function returns the serial id of last detected RFID card.
On the registration page, Ajax calls are made to the above method
A Flask app runs registration page to register card-id as the user. Ajax calls are made to the RFID fetch function.
(This flask app can be accessed on the webpage on any computer connected in the same network as pi.)

6.2 System
6.2.1 Architecture as below:-
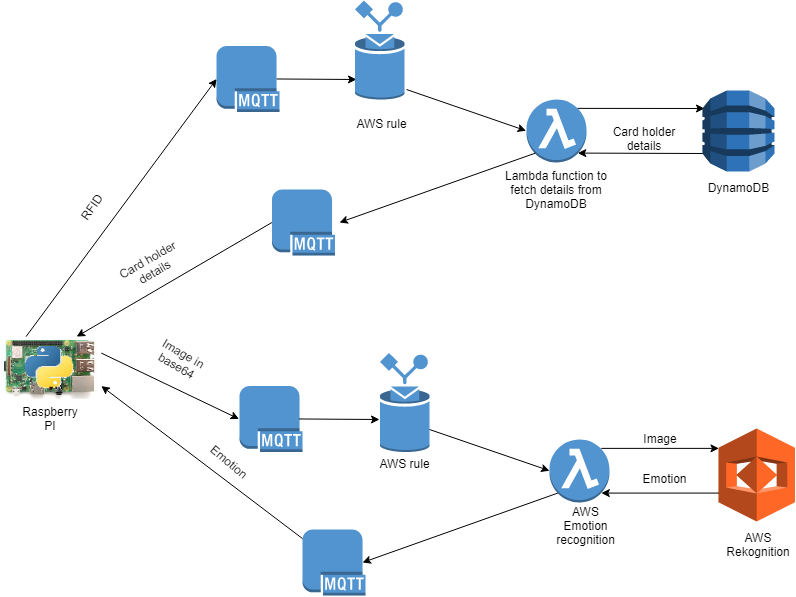
6.2.1 Architecture as below:-
It involves the 5 steps as below:-
Discussing each step in detail to get you a more clear idea:-
- This function checks for the validity of RFID card i.e. whether Scanned card is registered in the database successfully or not.
- If the details exist for the received RFID in Dynamo-DB then it publishes the details on the MQTT topic else it publishes “No data found”
- Raspberry-pi is only going to interact with AWS through MQTT. AWS provides a service called rule to perform the action when the message is received on any MQTT
topic. We can create a rule to call the lambda “RFID_fetcher” function when
Raspberry-pi publishes the message to topic “RFID_fetch”
- This function receives a base64 encoded image. First, it is decoded and then sent to the AWS recognition to generate the required output for system
- A rule that invokes Emotion_Detector lambda function.
- This is the core program which allows pi to communicate with hardware as well as AWS with MQTT.
- Connections as below:
- Push button: Between VCC and GPIO10
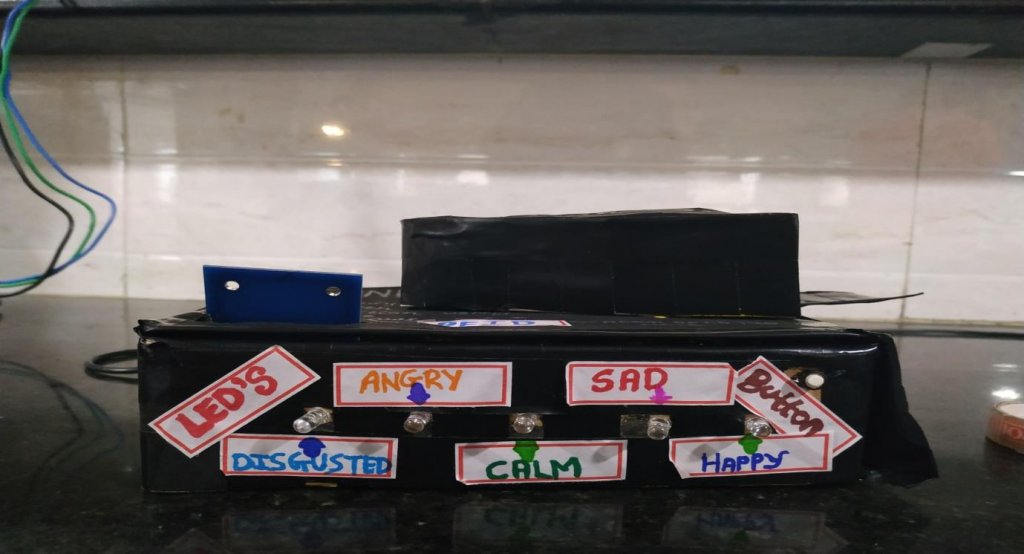
- LEDs:
- Happy: GPIO29
- Sad: GPIO31
- Calm: GPIO33
- Angry: GPIO3
- Disgusted: GPIO37
- Servo motor: GPIO3
System working in real time:-
Next, the program keeps listening for the RFID card. When RFID card is detected it’s Serial number is published to MQTT topic. Then it waits for the reply on the subscribed topic. If the reply is “No data found” then again program goes for scanning the card. If valid data is received the process is further continued.
The flowchart for the program is as follow:-

7. Some snapshots of the Candy Dispenser box: