How to create custom Live template in Android Studio
Android Studio provides code templates that follow the Android design and development best practices to get you on the right track to creating beautiful, functional apps. You can use templates to create new app modules, individual activities, or other specific Android project components.
There are several advantages of having custom code templates:
- Time saving
- Flexibility
- Enforcing coding conventions
How to create Custom Code Templates step by step
1. Right-click on a source code folder, hover over on “New” then click “Edit File Templates”.
2. Click the plus button to create a new template.

3. Give Template name and extension.

4. Then Paste and write your template code in the area below it. There are a couple of variables you can use that will get substituted when the user creates the file of their choice.
Here are some predefined ones:
- ${NAME} is the file name that the user chooses
- {PACKAGE_NAME} is the package name.
You can create your own custom variable using ${VARIABLE_NAME}
Code:
#if (${PACKAGE_NAME} && ${PACKAGE_NAME} != "")package ${PACKAGE_NAME};#end
import android.content.Context
import android.view.LayoutInflater
import android.view.View
import android.view.ViewGroup
import androidx.recyclerview.widget.RecyclerView

class ${NAME}(aContext: Context,aItems:ArrayList<${MODEL_CLASS}>) :
RecyclerView.Adapter<${NAME}.${VIEWHOLDER_CLASS}>()
{
//Variable declaration
private var mListener: onClickListener? = null
private var mView: View? = null
private var mContext = aContext
private var mItems = aItems
private var mOriginalItems:ArrayList = aItems
private var mLongListener: onLongClickListener? = null

/* setOnClick listener */
fun setOnClickListener(mListener: onClickListener)
{
this.mListener = mListener
}
/* OnClick listener */
interface onClickListener {fun onClick(i: Int,mModel: ${MODEL_CLASS} ) }

/* setOnLongClick listener */
fun setOnLongClickListener(mListener: onClickListener) { this.mListener = mListener }

/* OnLongClick listener */
interface onLongClickListener { fun onLongClick(i: Int, mModel: Model) }

/* inflate layout */
override fun onCreateViewHolder(parent: ViewGroup, viewType: Int): ${VIEWHOLDER_CLASS} {
mView = LayoutInflater.from(parent.context).inflate(R.layout.${LAYOUT_RES_ID}, parent, false)
return ${VIEWHOLDER_CLASS}(mView!!)
}

/* bind ViewHolder */
override fun onBindViewHolder(viewHolder: ${VIEWHOLDER_CLASS}, position: Int)
{
val mModel = mItems[position]
viewHolder.itemView.setOnClickListener {
if (mListener != null)
{
mListener!!.onClick(position,mModel)
}}

viewHolder.itemView.setOnLongClickListener {
if (mLongListener != null) {
mLongListener!!.onLongClick(position,mModel)
}
return@setOnLongClickListener true
}
}

/* get item count */
override fun getItemCount(): Int
{ return mItems.size }

/* view holder */
inner class ${VIEWHOLDER_CLASS}(itemView: View) : RecyclerView.ViewHolder(itemView) {}

/* remove item */
fun removeItem(position: Int) {
mItems.removeAt(position)notifyItemRemoved(position)
}

/* restore item */
fun restoreItem(item: ${MODEL_CLASS}, position: Int) {
mItems.add(position, item)
notifyItemInserted(position)
}

/* get data */
fun getData(): List<${MODEL_CLASS}> {
return mItems
}

/* clear data */
fun clearData() {
mItems.clear()
mOriginalItems.clear()
notifyDataSetChanged()
}

/* filter data */
fun filterData(aFilterString: String): Int {
clearData()
if (aFilterString.length == 0) {
mItems.addAll(mOriginalItems)
} else {
for (data in mItems as List<${MODEL_CLASS}>) {
if (data.${FILTER_VARIABLE_NAME}.toLowerCase().contains(aFilterString.toLowerCase()))
{
mItems.add(data)
notifyItemInserted(mItems.size-1)
}
}
}
return mItems.size
}
}
5. Then click on apply and ok.
6. Right-click on the package. Select new and select your template.
7. Then give the name.
So whenever using this template add the following information
Filename: Name of your file
MODEL CLASS: Name of your model class
VIEWHOLDER CLASS: Name of viewholder class
LAYOUT RESID: Name of the layout file
FILTER_VARIABLE_NAME: Field of the model class
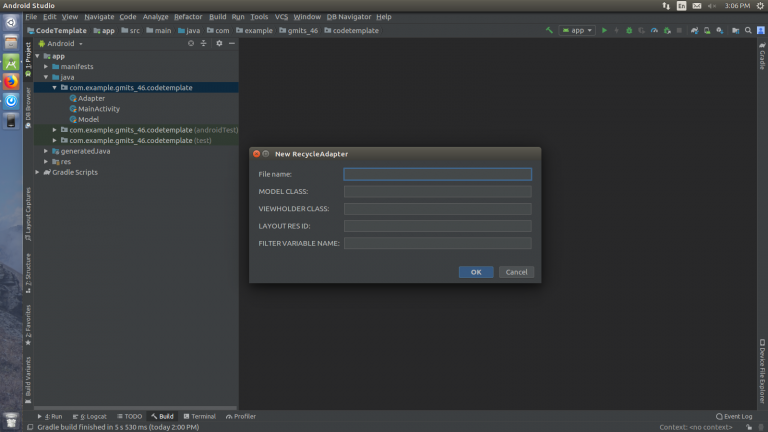
8. Click on OK. and create one file.
So applying this code the developer can handle click event, long-press click event, filter, restore an item, add an item, clear data, etc.
Live Templates
Live templates are “frequently-used or custom code constructs that you can insert into your source code file quickly”
There are several advantages of having live templates:
- increase the speed of development
- Efficiency
- Accuracy
You can create a live template for java, JSON, xml, kotlin etc.so developer can easily develop an application.
There are already some predefined live templates that you can use:
- logm – logs your method name being called with its arguments that were passed to it. (I
find this one the most useful) - psfs – Replaces with public static final String
- .null – When you want to surround your code with a null check, instead of typing if ( item == null){}. Type item followed by .null, then press enter. This will surround the object with a null check!
How to create your own Live template
1. Click on File and select “ settings” option.
2. Then open one screen. It belongs to many options.Select Editor in that option select Live Template option. So you will also see the list of available templates.

3. Click on the plus(+) button and create a “Template Group”. Give it a name.
4. Then click the plus(+) button again and select “Live Template”. You will be able to specify the abbreviation you want to use and a brief description of the template. You then need to specify the template text. This is what the abbreviation will be replaced with when you type the abbreviation.

5. Define the context of the template by clicking “ Define “. So in this example select XML.

6. Click OK and then use it!
7. Open XML file,type the abbreviation you have created and tab or enter will replace it with the template text.