Android For Beginners
What is Android?
Android is an open-source operating system based on Linux with a Java programming interface for mobile devices such as smartphones (Touch Screen Devices who supports Android OS) as well for Tablets too.
Why Android?
- Open Source
- Extended Marketing
- Larger Developer & Community Reach
- Inter-App Integration
- Customizable
- Overcome the cost of developing
Features of Android
- Attractive UI
- Connectivity
- Multi-touch
- Multi-tasking
- Multi window support
- Resizable widgets
- GCM
- Multi-Language
- Android Beam
- Storage
- Media support
- Automation
- Messaging
- Native support
Android Development Environment Setup
Generally to build an application for Android we should have Java Development Kit (JDK), Android SDK, and a development environment.
The Android SDK is compatible with Windows, Mac, and Linux operating systems to build android applications based on our requirements.
By downloading Android Studio directly from Google’s website to set up we can quickly set up the development environment.
Android Development Environment Setup
1. Download the latest version of Android Studio from (Android Studio) and launch Android Studio.exe file by double-clicking on it. The latest version is 3.4.2.
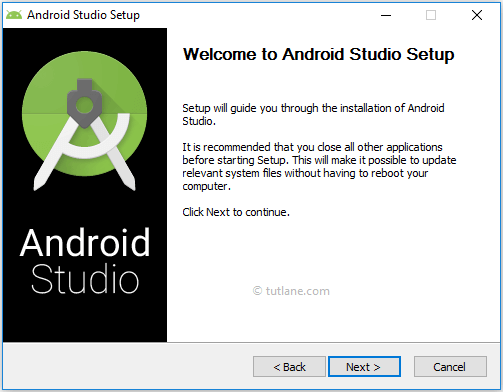
2. The initial android studio setup screen will open like as shown below in that click Next to continue for further steps of environment setup.
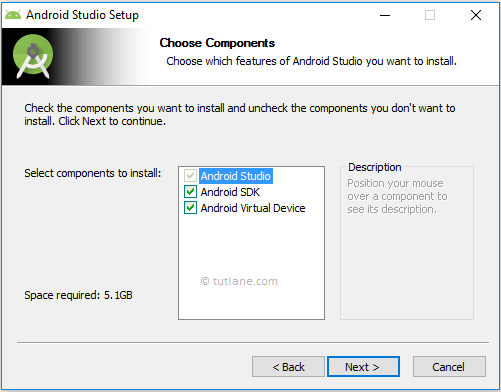
3. Now we need to select a required component to set up an android environment. Here we selected all three components and click Next.
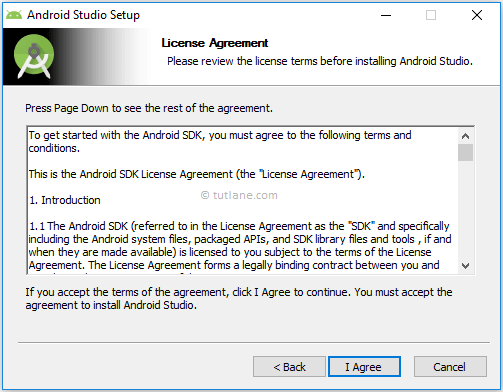
4. Now we need to agree to the License agreements to proceed further, click on I Agree on the button.
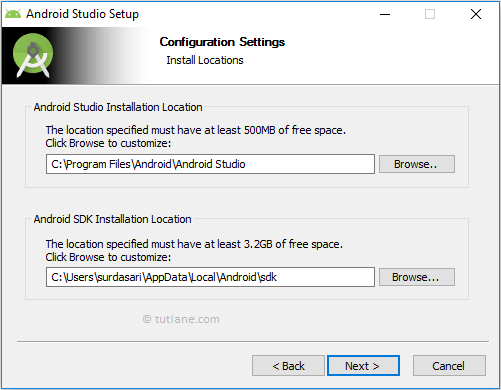
5. Now we need to specify the local machine drive location to install Android Studio and Android SDK. After selecting the location path to install required components, click Next.
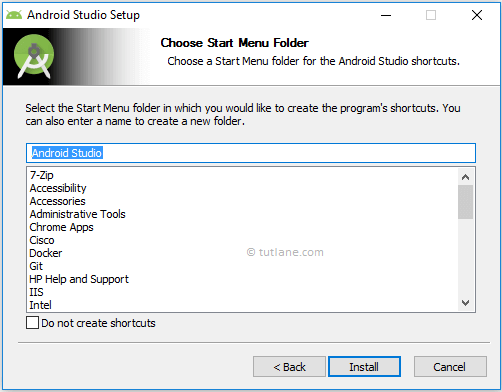
6. Now select the start menu folder to create shortcuts for android studio and click Install.
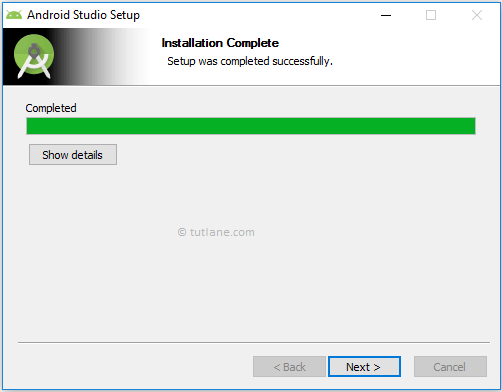
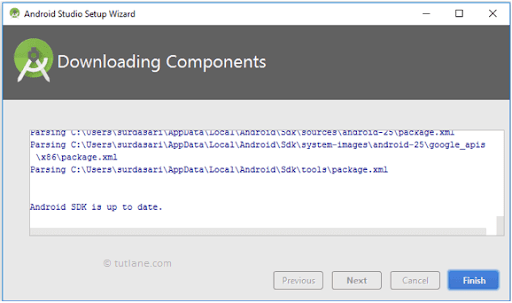
7. Once we agree to the Install button the installation process will start and click Next after completion of installation.
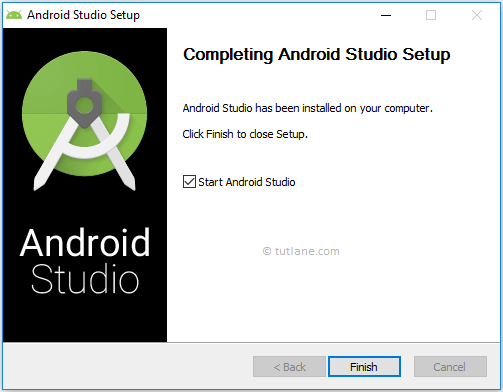
8. After that, it will show the installation fulfillment wizard in that click Finish to launch the android studio.
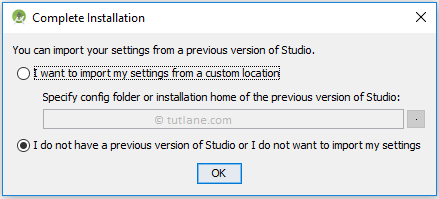
9. While launching Android Studio it will provide you an option to import settings of the earlier version of the studio. In case if you don’t have any earlier version, select the second option and click OK.
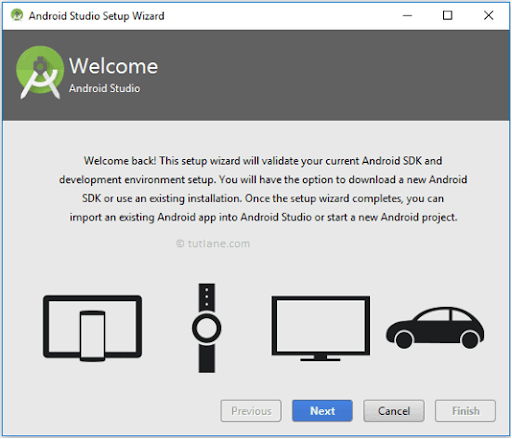
10. Now android studio will open a welcome wizard window in that click Next to confirm our current Android SDK and development environment setup.
11. Now select a Standard installation type and click Next to install common settings and options.

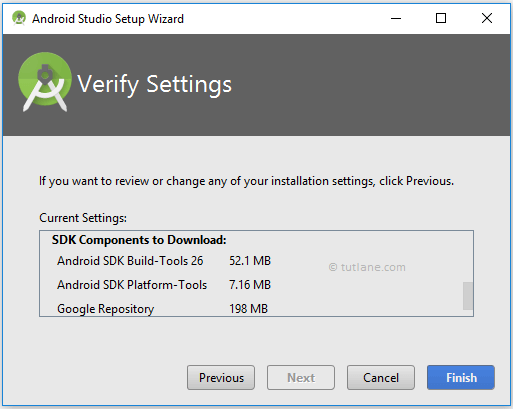
12. Now verify settings and click Finish to complete the android studio setup process.
13. After completion of required components installation click on Finish.
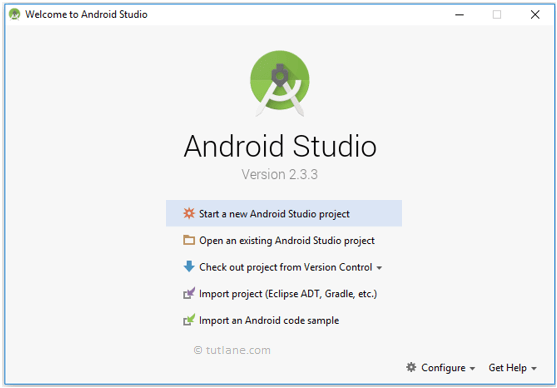
14. After fulfillment of all required components installation, we will be able to see the Android Studio welcome window.
Android – Application Components
Application components are the essential building blocks of an Android application. These components are loosely coupled with the application manifest file AndroidManifest.xml that describes each component of the application and how they communicate.
There are following four main components that can be used within an Android application.
1. Activities
They dictate the UI and handle the user interaction to the smart phone screen.
2. Services
They handle background processing associated with an application. For Service, we don’t have any user interface and it will run the apps in the background like play music in the background when the user in a different app.
3. Broadcast Receivers
They handle communication between Android OS and applications. Broadcast Receivers is a component which will allow a system to deliver events to the app like sending a low battery message to the app.
4. Content Providers
They handle data and database management issues. It is used to exchange the data between the apps based on the requests.
Additional Components
1. Fragments
Represents a portion of user interface in an Activity.
2. Views
UI elements that are drawn on-screen including buttons, lists forms etc.
3. Layouts
View hierarchies that control screen format and appearance of the views.
4. Intents
In android, intent is a messaging object which is used to request an action from another component.
In android, intents are mainly applied to perform the following things.
– Starting an Activity
– Starting a Service
– Delivering a Broadcast
– Dial a phone call
There are two types of intents available in android, those are
– Implicit Intent
– Explicit Intent
5. Resources
External elements, such as strings, constants and drawable pictures.
6. Manifest
Configuration file for the application.
Android – Hello World Example
1. Click on Android studio icon, it will show screen as shown below
Here we’re going to choose the New Project option because we haven’t created any other project and we need to create a new one. So, we will select the New Project from the given options.
However, we can choose Import Project if we’d like to import a project from any other way, for example, Eclipse project into Android Studio. Android Studio will convert the Eclipse project to an Android Studio project, adding the necessary configuration files for us.
If we select Open Project from the list of options, we can open projects created with either Android Studio or IntelliJ IDEA.
Check out from Version Control, we can check out a copy of a project that’s under version control. This is a great way to quickly get up to speed with an existing project.
To get us started, choose New Project from the list of options. This will show us a list of options to configure our new project.
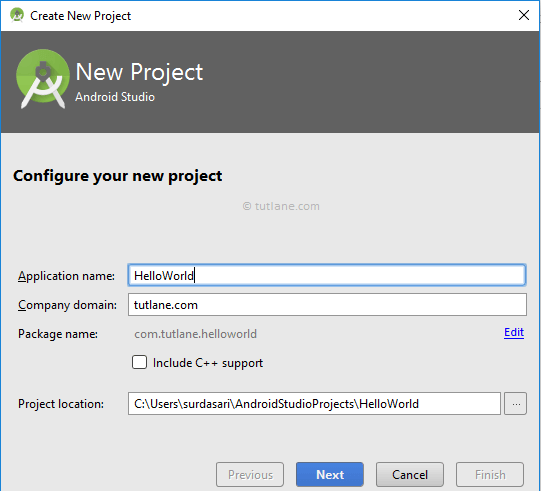
2. We have to mention our Project’s name, Company domain and Project location (we called it the main path where this application will be saved) because the Package name will be created automatically as we create the project in Android Studio.
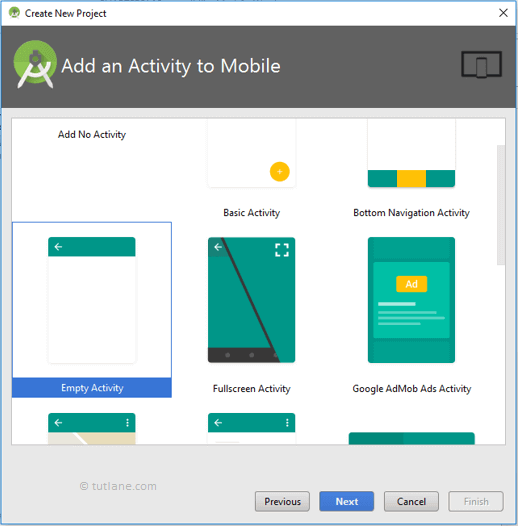
3. Click Next to select the particular Activity for our requirement. If we will select the “Empty Activity”, then it will show the empty activity in our layout. In case if we choose other options, then it will show the activity which we have chosen. Here we are selecting Empty Activity.
4. After choosing the “Activity” for our application, then click on the “Next” button and it will take you to the next screen.

5. Here we can see that the Activity i.e. EmptyActivity which we selected in the previous section and the java file name i.e. “MainActivity”. Now we are ready for the final step, just click on the “Finish” button and it will take you to the main page where we have to do the coding and create new layouts over there.
Android Layout File (activity_main.xml)
The UI of our application will be designed in this file and it will contain Design and Text modes. It will exist in the layouts folder and the structure of the activity_main.xml file in Design mode.
Android Main Activity File (MainActivity.java)
The main activity file in the android application is MainActivity.java and it will exist in the java folder. The MainActivity.java file will contain the java code to handle all the activities related to our app.
Android Manifest File (AndroidManifest.xml)
Generally, our application will contain multiple activities and we need to define all those activities in the AndroidManifest.xml file. In our manifest file, we need to mention the main activity for our app using the MAIN action and LAUNCHER category attributes in intent filters (). In case if we didn’t mention the MAIN action or LAUNCHER category for the main activity, our app icon will not appear in the home screen’s list of apps.
Read more
Run Android Hello World App
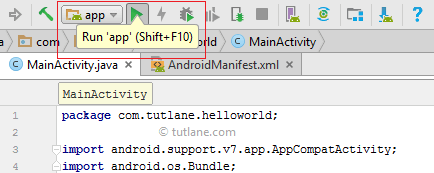
To run android applications we need to click on Run button
After clicking on play button new window will open in that select Android Virtual Device (AVD) and click OK like as shown below.
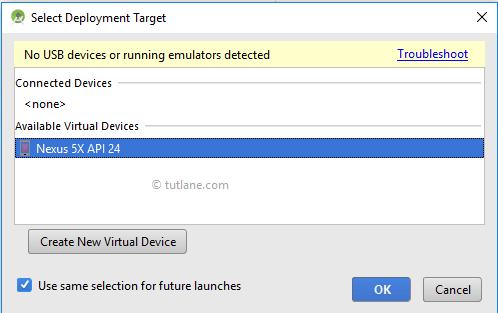
In case if you are not able to see any virtual device, then you need to create a virtual device to run your application for that you can follow this step:
1. Click On create a new virtual device.

2. Select the required device type and Click Next to create a virtual device.
3. Now we need to download and select the system image and click Next.
4. Now verify the configuration of android virtual device (AVD) and click Finish.
Now our android hello world application will show the result
Anatomy of Android Application
You should be aware of a few directories and files in the Android project
1. Java
This contains the .java source files for your project. By default, it includes a MainActivity.java source file having an activity class that runs when your app is launched using the app icon.
2. res/drawable
This is a directory for drawable objects that are designed for high-density screens.
3. res/layout
This is a directory for files that define your app’s user interface.
4. res/values
This is a directory for other various XML files that contain a collection of resources, such as strings, colors, animation, etc.
5. AndroidManifest.xml
This is the manifest file which describes the fundamental characteristics of the app and defines each of its components.
Read more
6. Build.gradle
This is an autogenerated file which contains compileSdkVersion, buildToolsVersion, applicationId, minSdkVersion, targetSdkVersion, versionCode and versionName
Activity Lifecycle
Android system initiates its program within an Activity starting with a call on onCreate() callback method. There is a sequence of callback methods that start up an activity and a sequence of callback methods that tear down activity.
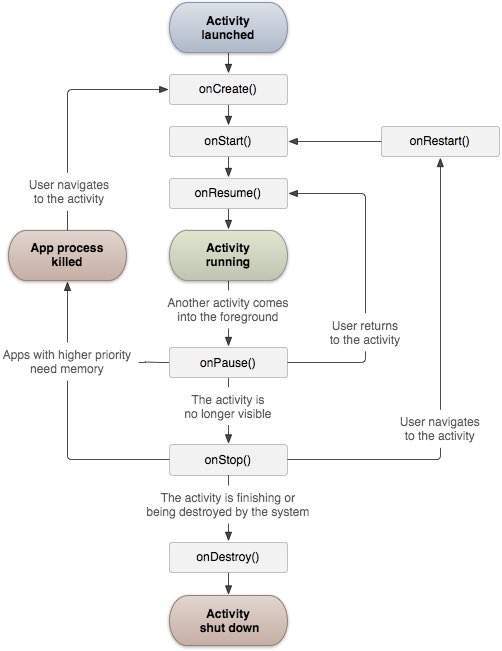
onCreate()
This is the first callback method and it fires when the system creates an activity for the first time. During the activity creation, activity entered into a Created state.
Example:
@Override
protected void onCreate(Bundle savedInstanceState) {
	super.onCreate(savedInstanceState);
	setContentView(R.layout.activity_main);
}
Once onCreate() method execution is finished, the activity will enter into Started state and system call the onStart() method.
onStart()
The onStart() callback method will invoke when an activity entered into Started State by completing onCreate() method. The onStart() method will make an activity visible to the user and this method execution will finish very quickly.
Example:
@Override
protected void onStart()
{
	super.onStart()
}
After completion of onStart() method execution, the activity enters into Resumed state and system invoke the onResume() method.
onResume()
This is called when the user starts interacting with the application.
The app will stay in this Resumed state until another activity happens to take focus away from the app like getting a phone call or screen turned off, etc.
In case if any interruption events happen in Resumed state, the activity will entered into Paused state and the system will invoke onPause() method.
After an activity returned from Paused state to Resumed state, the system again will call onResume() method due to this we need to implement onResume() method to initialize the components that we release during onPause() method
Example:
@Override
   protected void onResume() {
      super.onResume();
      Log.d(msg, "The onResume() event");
   }
If any interruption happens in Resumed state, the activity will be entered into Paused state and the system will invoke onPause() method.
onPause()
The paused activity does not receive user input and cannot execute any code and called when the current activity is being paused and the previous activity is being resumed.
Example:
protected void onPause() {
      super.onPause();
      Log.d(msg, "The onPause() event");
   }
After completion of onPause() method execution, the next method is either onStop() or onResume() depending on what happens after an activity entered into a Paused state.
onStop()
After completion of onPause() method execution, the next method is either onStop() or onResume() depending on what happens after an activity entered into a Paused state.
The onStop() method is useful to release all the app resources which are no longer needed to the user.
Example:
@Override
protected void onStop()
{
	super.onStop();
}
The next callback method which raised by the system is either onRestart(), in case if the activity coming back to interact with the user or onDestroy(), in case if the activity finished running.
onRestart()
The system will invoke onRestart() method when an activity restarting itself after stopping it. The onRestart() method will restore the state of activity from the time that is being stopped.
The onRestart() callback method in android activity will always be followed by onStart() method.
onDestroy()
The system will invoke onDestroy() method before an activity is destroyed and this is the final callback method which received by the android activity.
The system will invoke this onDestory() callback method either the activity is finishing or system destroying the activity to save space.
Example:
@Override
public void onDestroy()
{
super.onDestroy();
}
The onDestroy() method will release all the resources which are not released by previous callback onStop() method.
Android Intents
In android, Intent is a messaging object which is used to request an action from another app component such as activities, services, broadcast receivers, and content providers.
Intent Types
There are two types of intents available in android, those are Implicit Intents and Explicit Intents
Implicit Intents
In android, Implicit Intents won’t specify any name of the component to start, instead, it indicates an action to perform and it allows a component from another app to handle it. For example, by using implicit intents we can request another app to show the location details of the user, etc.
 String url = editText.getText().toString();
            	Intent intent = new Intent(Intent.ACTION_VIEW, Uri.parse(url));
            	startActivity(intent);
Explicit Intent
Explicit Intent specifies the component. In such case, intent provides the external class to be invoked.
startActivity(new Intent(getApplicationContext(), ActivityTwo.class));
Using this blog you can build an android application and gain a basic knowledge of android. Thank You.