AWS IoT with LAMBDA FUNCTION

AWS Lambda is a compute service that lets you run code without provisioning or managing servers. AWS Lambda executes your code only when needed and scales automatically.

AWS IoT with LAMBDA FUNCTION

Architecture:

In this blog we are going to learn something very interesting and basic approach to a rule that calls a Lambda function, passing in data from the MQTT message that button-lgtriggered the rules. This allows you to extract data from the incoming message and then call another AWS. So, let’s begin…Follow as per I go.

1. Open AWS Management Console.

2. Now, Create Lambda Function:

  • While creating a function, we have three such option to create function:
  1.  Author from scratch
  2. Use a blueprint
  3. Browse serverless app repository
    Here, we are going to use the second option i.e. Use a blueprint.
  • Enter a name for your function.
  • Create a new role with basic Lambda permissions

3. Now, In AWS Management Console go into IAM to modify role as per your requirement.

  • Search for your role: Mine is here like this. (Which is already showed you above)
  • Attach policies as per your requirement, here I am adding basic excitation DynamoDB policy, AWSLambdaSNSPuublishPolicyExecutionRole, another aws-iot-role-iotPulish policy for SNS we attached that reason I’ll tell you later.

4. Here we can see our attached policy i.e. AWS IoT and SNS.

5. We will create Rule in AWS IoT Core, which will help us to call the Lambda Function when the intended Topic gets the message. So, for that, we will go into the AWS IoT service in

  • In Act, we will make Rule for our Lambda Function.
  • Click on Create Button to get into further
  • Here we will add Action i.e. “Send a message to Lambda Function” (drashti_lambda_)
  • Here we can see our RULE (drashti_lambda_rule) is now created for our Lambda Function.
  • Here we trigger our Lambda Function with AWS IoT and SNS.
  • Both are Enabled means both can simultaneously fire the trigger.

6. Add the below given code in lambda function.py:

from __future__ import print_function
import json
import boto3
print('Loading function')
def lambda_handler(event, context):
 # Parse the JSON message
 eventText = json.dumps(event)

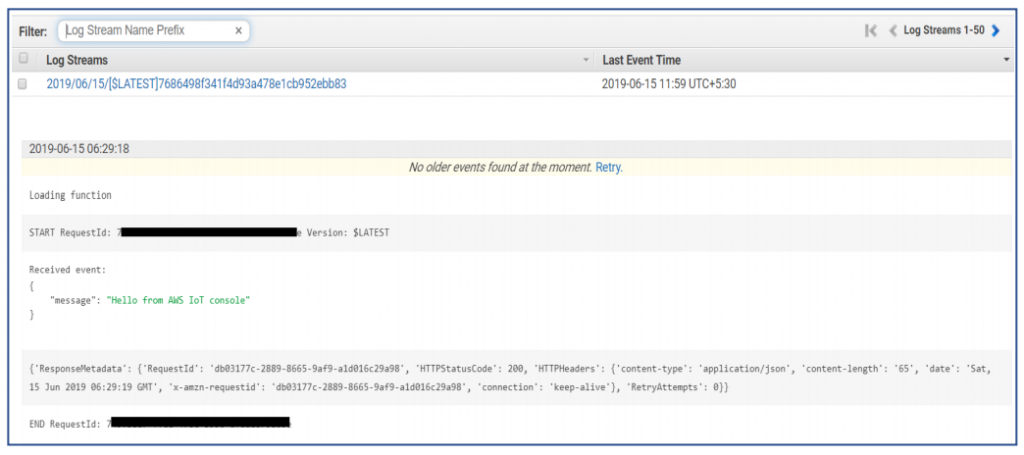
 # Print the parsed JSON message to the console; you can view this text in the Monitoring tab in the Lambda console or in the
CloudWatch Logs console
 print('Received event: ', eventText)
 # Create an SNS client
 sns = boto3.client('sns')
 # Publish a message to the specified topic
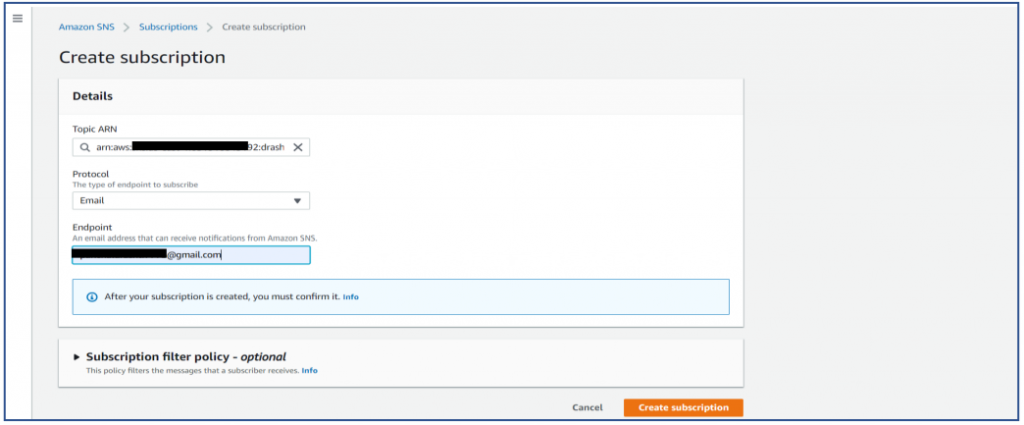
 response = sns.publish (
 TopicArn = "ARN",
 Message = eventText
 )
 client = boto3.client('iot-data')
 #Change topic, qos and payload
 response = client.publish(
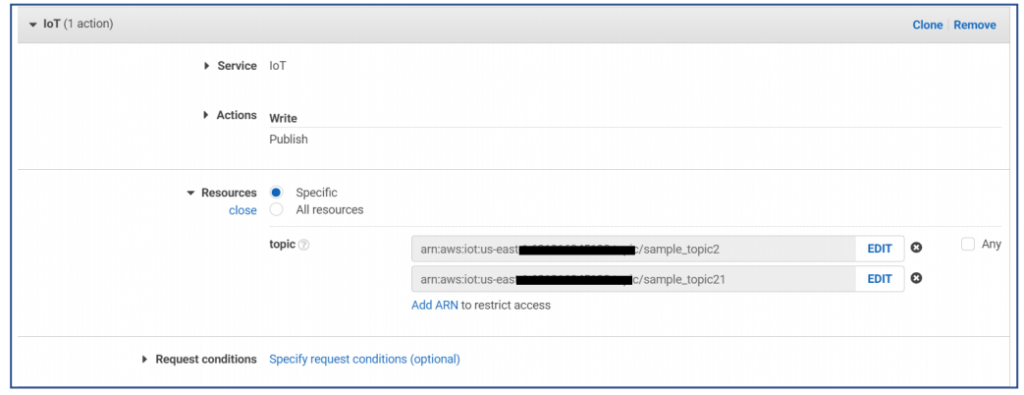
 topic='sample_topic21',
 #note:
 qos=0,
 payload=eventText
)
 print(response)
  • Then Save the respective code, and Test it.
  • In monitoring, we will find Logs in CloudWatch.
  • Test successful and we got log hereby. Means our code is correct.

7. Now we will see, how to Publish.

  • Go into IAM in that Click on Role and add ARN-topic for Subscription.
  • Add ARN as you want your topic name. Here it is
    When we Publish MY_IOT_TOPIC topic we are actually triggering Lambda Function, in which we have Published a topic sample_topic21.
    Such that, we are Publishing My_IOT_TOPIC on MQTT and we got triggered to our function and we get our intended message.
    That message is in the log of Lambda Function. That we can see through View logs of CloudWatch.
  • Here we successfully got the message, that means we publish our message successfully on topic.

8. We can also successfully publish a message via SNS and MQTT. That is shown below:

  • Create Subscription on topic and set endpoint protocol EMAIL to get notified on it.
  • When I Confirm Subscription, it will display “Subscription Confirmed!”
  • Now, we can see in status, it is confirmed.
  • We are sure you followed the blog as per instructed and you got your message successfully too as we got. We have covered each and every little detail and showed all the steps with screenshots to get you perfect idea. Thanks for referring our blog, we hope it was helpful to you and visit us again.