Keyboard-Less KYC
In this tutorial, you will learn some interesting concepts and using that we will implement our KEYBOARD-LESS KYC so let’s get started with this fun learning.
1. Introduction:
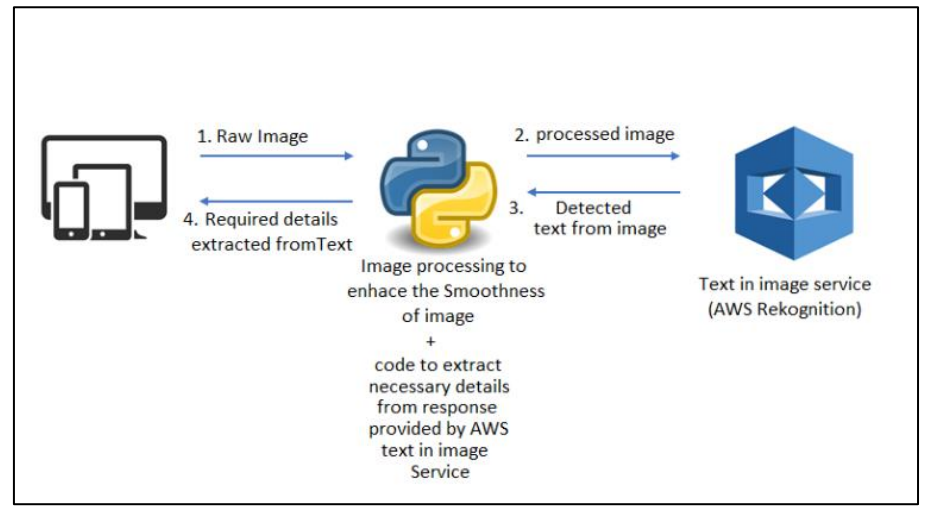
We will design the system of KEYBOARD-LESS KYC where you will be able to extract the data from the AADHAR-CARD like your Name, Date of Birth, Gender, Aadhar- number and Mobile number(if provided) by simply scanning it’s image using the concept like AWS REKOGNITION TEXT IN IMAGE service , Flask and Open-CV in python.
2. The System demo as below:
3. Requirements:
- AWS REKOGNITION service TEXT IN IMAGE
- Installing Boto3, Open-CV, and Flask
- Python coding with boto3, Open-CV, and Flask in python
4. Pre-requisite basic knowledge in concepts like:-
- AWS account to get access to the AWS services
- Python installing and Basic knowledge in Python coding
- Boto3 with Python
- Flask in Python
- Open-CV in Python
5. Working of the system:
The Simple 4 steps process is shown in architecture:
6. Implementation of the system:
The implementation of the system will be divided into the following steps:-
- Getting access to the AWS REKOGNITION TEXT IN IMAGE service
- Installing the modules for accessing AWS REKOGNITION service such as boto3
- Installing the Flask in python and Open-CV
- Python coding using Flask, Open-CV and for accessing the AWS service required
Step-1: Getting access to the AWS REKOGNTION TEXT IN IMAGE service:-
[Make sure that you have Amazon AWS account if not then set up your account to get access to the AWS REKOGNITION service]
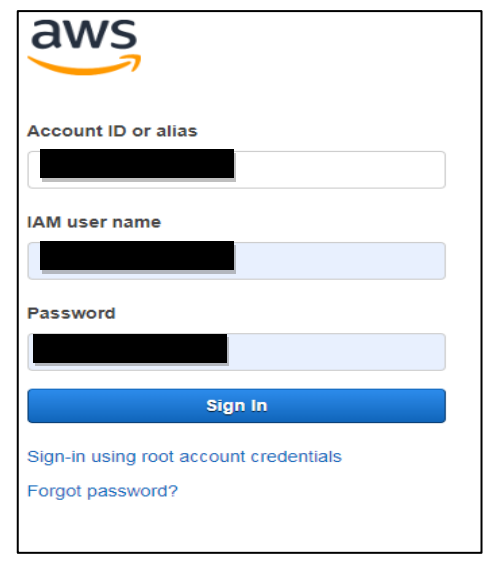
- After getting AWS account it’s time to access its Services so we need to sign-n to the AWS management console with your account
- You will find the sign-in page as below after set-up of account so just get into it
- After signing in your account search for the AWS REKOGNITION service and click on the service as shown below:-
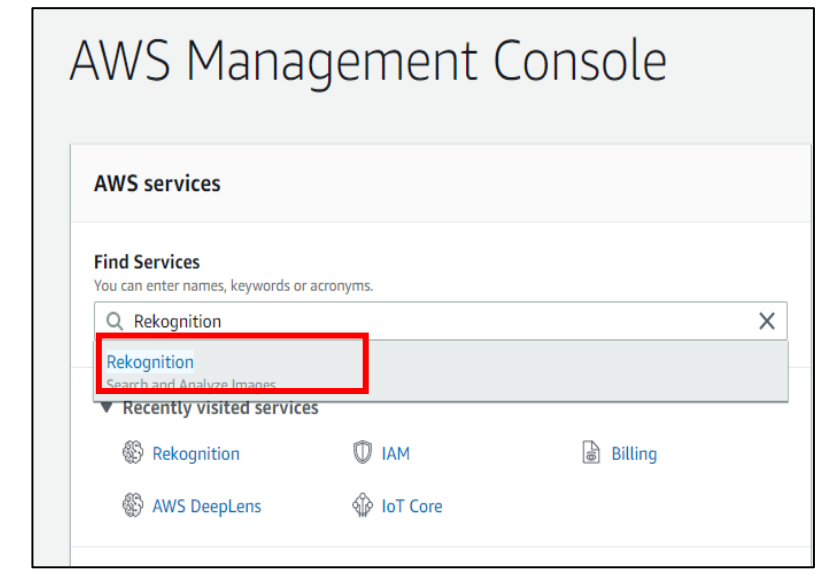
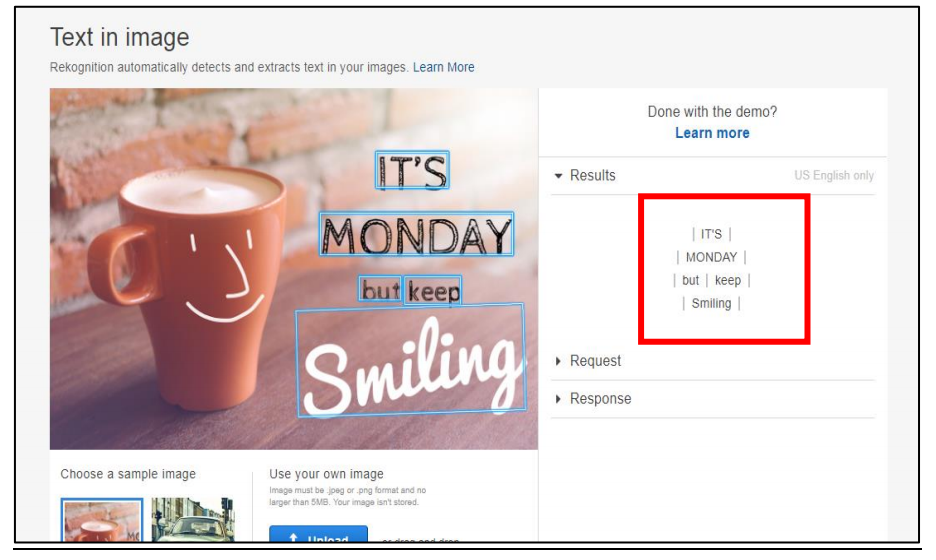
- Amazon Rekognition services will be listed to you as below then you need to check for Text in image
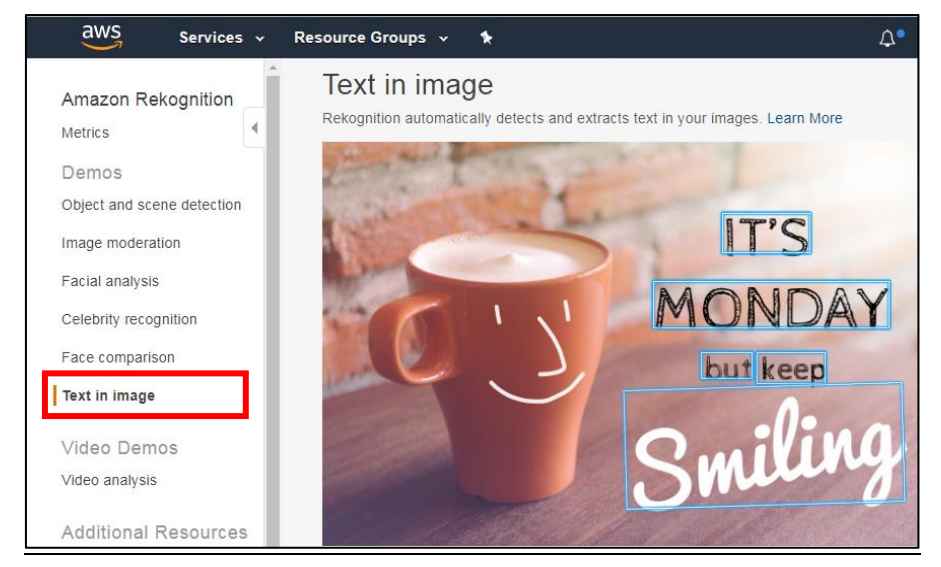
- Learn about the service and check the response by testing different images:-
[ Before following the below steps Make sure that you have install the python if not than install it from the link:- https://www.python.org/downloads]
Step-2: Installing the modules for accessing AWS REKOGNITION service such as boto3:-
- Boto3 is the Amazon Web Services (AWS) Software Development Kit (SDK) for Python, which allows Python developers to write software that makes use of services like Amazon Rekognition
- Use the following with cmd as command to install the boto3 as below:-
pip install boto3
- Once the module is installed it will be further import while python coding
Step-3: Installing the Flask and Open-CV in python:-
- Flask is a microframework for Python based on Werkzeug, Jinja 2 and good intentions.
- Open-CV is a library of programming functions mainly aimed at real-time computer vision.
- Use the following with cmd as command to install the flask as below:-
pip install Flask
- Use the following with cmd as command to install the flask as below:-
pip install opencv-python
- Once the module is installed it will be further import while python coding
Step – 4: Python coding using Flask, Open-CV and for accessing the AWS service required:-
@app.route('/')

def index():

return render_template('index.html')
Above is the Flask code to load the index html in main.py
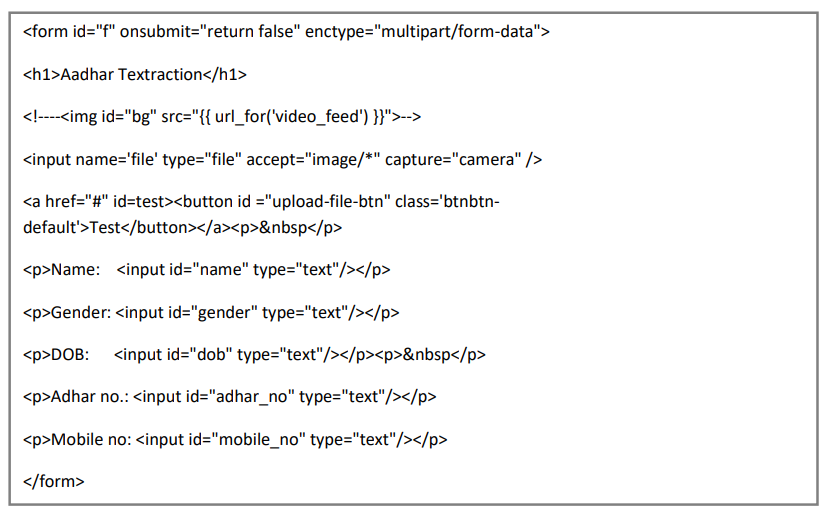
Provides mobile device camera access Index .html will have simple form as follow:
Ajax is used to transfer file from html file to python when the button is clicked.
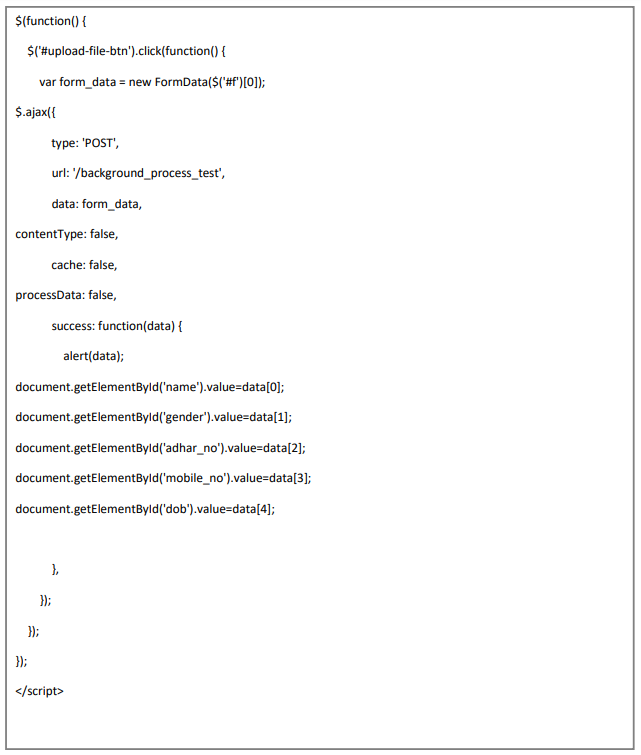
Above AJAX call invokes image_gatway() function in main.py file
Image gatway function will save the raw image temporarily and pass it as an argument to the gatdata() function of aadhar_extract class in Scanner.py module.
@app.route('/image_gatway',methods=['POST'])
def background_process_test():
 f=request.files['file']
 UPLOAD_FOLDER = '.'
app.config['UPLOAD_FOLDER'] = UPLOAD_FOLDER
f.save(os.path.join(app.config['UPLOAD_FOLDER'],"sample.jpg"))
 s=Scanner.AdharExtract()
 d=s.getData("sample.jpg")
In getData function first image will be processed to make it smooth using open-CV with following :
image=cv2.imread(img1) #read in the image
 image=cv2.resize(image,(1300,800)) #resizing because opencv does not work well with
bigger images
orig=image.copy()
 gray=cv2.cvtColor(image,cv2.COLOR_BGR2GRAY) #RGB To Gray Scale
 blurred=cv2.GaussianBlur(gray,(5,5),0) #(5,5) is the kernel size and 0 is sigma that
#determines the amount of blur
cv2.imwrite('processed_image.png',blurred)
The first image is converted to grayscale. Then it is blurred using gaussian blur to remove noise from the image.
The blurred image is saved temporarily so that AWS API can send it to Text in Image AWS Reckognition service
Boto3 is used to connect with Aws service
client=boto3.client('rekognition',region_name='us-west-2',aws_access_key_id='’,aws_secret_access_key= '')
aws_access_key_id and aws_secret_access_key can be generated from security credential which is under the drop-down menu of your account name in the blue title bar.
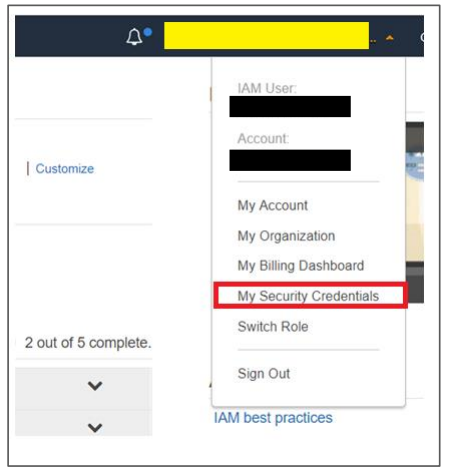
Now click on Create access key

Access key id and the access key will be generated and showed in prompt. Note them down.
Following statements invokes the text in the image and catches the output in the response variable
with open("processed_image.png", "rb") as imageFile:
response=client.detect_text(Image={'Bytes': imageFile.read()})
textDetections=response['TextDetections']
Regular expression is used to extract the name ,gender, dob and aadhar number from detected text.
Patterns for identifying Name,Gender, DOB, Adhar number:
Name: It is extracted as line containing 2 or 3 words separated by single space with first latter capital (above regular expression was extracting “Government Of India” too so some more expressions are used to take care of that)
DOB: if the line contains word ‘DOB’ then the string which is at the 5th index from word ‘DOB’ is the date of birth
Gender: Male if line found containing word ‘MALE’ or if Female line found containing word ‘MALE’
Aadhar number: line containing the 3 words each of 4 digits separated by single space.
Mobile number: Word with 10 digits.
for text in textDetections:
print('Detected text:' + text['DetectedText'])
if(text['Confidence']>85):
if(text['Type']=='LINE' and re.search(r'\w* \w*',text['DetectedText'])):
if('DOB' in text['DetectedText']):
print('Date of Birth:',text['DetectedText'][text['DetectedText'].find('DOB')+5:])
DoB=text['DetectedText'][text['DetectedText'].find('DOB')+5:]
if('MALE' in text['DetectedText']):
print("Gender: Male")
gender="Male"
elif('FEMALE' in text['DetectedText']):
print("Gender: Female")
gender="Female"
if(re.match(r'\d{4} \d{4} \d{4}',text['DetectedText'])and text['Type']=='LINE'):
print('Aadhar number:' + text['DetectedText'])
aadhar_no=text['DetectedText']
if(re.search(r'[A-z][a-z]{1,} [A-Z][a-z]{1,}\s*[a-zA-Z]*',text['DetectedText']) and 'GOV' not in
text['DetectedText'] and 'Gov' not in text['DetectedText'] and ":" not in text['DetectedText']
and text['Type']=='LINE'):
print("Name:",text['DetectedText'])
name=text['DetectedText']
if(re.match('\d{10}',text['DetectedText'])):
print("Mobile_no:",text['DetectedText'])
mobile_no=text['DetectedText']
(Print statements are only for the debugging purpose you can remove them or comment them as well)
7. Download the code zip file from below link:-
[Note:-Don’t forget to add your access-key and secret-key to Scanner.py file for working with this code]
Now let’s take this project to the next level by making it as a serverless web application so follow the steps below:-
8. Implementing KEYBOARD-LESS KYC as a serverless web application with aws lambda using zappa:-
- What is Serverless computing??
Serverless computing, a cloud computing execution model through which the cloud provider manages the allocation of machine resources. This is possible with AWS lambda and Zappa which provide flexibility to deploy flask application and make it serverless.
- What is Zappa and how it is used with AWS lambda to make flask application serverless
Zappa is a python serverless micro framework for AWS . It allows developers to build and deploy serverless Python applications (including, but not limited to, WSGI web apps) on AWS Lambda + API Gateway.
LET’S MAKE OUR FLASK APPLICATION SEVERLESS AND FOLLOW THE STEPS BELOW:-
Before deploying our project on aws lambda we have to make some necessary changes as follow Since there is no directory structure we will store the image in an s3 bucket and retrieve it from there. Remove following code
UPLOAD_FOLDER = '.'
app.config['UPLOAD_FOLDER'] = UPLOAD_FOLDER
 f.save(os.path.join(app.config['UPLOAD_FOLDER'],"sample.jpg"))
Following is the code to upload the image to s3 bucket.
file=request.files['file']
s3 = boto3.client('s3')
s3.upload_fileobj(file, 's3-bucket-name', 'sample.jpg')
[Note: Since opencv and numpy are two big modules the size of the app was over 300 MB and the free tier limit for the lambda function is 250MB so we removed the cv2 code for processing image ]
now in Scanner.py file, we will retrieve image file from s3 bucket
Replace this statement in file:-
response=client.detect_text(Image={'Bytes': imageFile.read()}) With this statement:-
response=client.detect_text(Image={'S3Object':{'Bucket':’bucket-name’', 'Name':’sample.jpg’}})
Zappa will need the aws credentials.
So create a text file with name credentials (with no extensions) at the following the path with content as below:-
C:\Users\your-user-name\.aws
Content of file as below:-
[default]
aws_access_key_id = your-access-key-id
aws_secret_access_key = your-secret-access-key
Step-1:- Working with the virtual environment:
- Install the virtual environment by below command:-
pip install virtualenv
- Create the virtual environment by below command:-
virtualenv env_name
- Activate the virtual environment created by below command:-
env_name/Scripts/activate
- After activating than install the flask and zappa in virtual env:-
pip install flask zappa boto3
Step-2:- Deploying Flask application using zappa:
- Zappa automatically configures your deployment settings using the init command:
zappa init
- Following screen will appear than enter the details as required:-
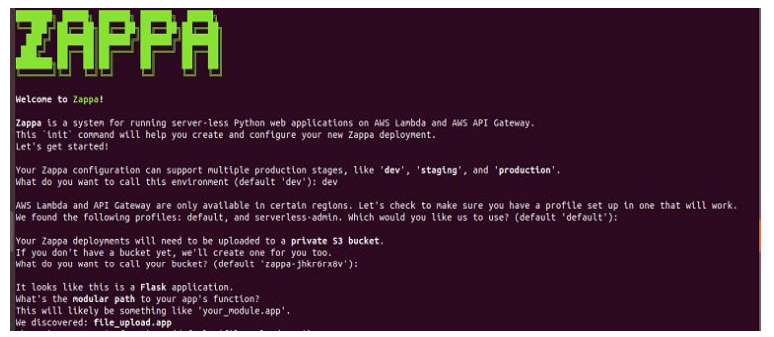
Also Zappa automatically detects the application type you use and you will be asked to fill details like s3 bucket name, deployment state, region, user name, role name, etc. Here you can give the required details as requested or you can proceed with default settings. Finally, a file will be created with the name zappa_settings.json in your application folder.
And the zappa_settings.json file looks like
"production": {
"app_function": "file_upload.app",
"aws_region": "us-east-1",
"profile_name": "default",
"project_name": "prorank-resume-",
"runtime": "python3.6",
"s3_bucket": "zappa-ugzgaelck"
}
Then you can deploy your application in AWS Lambda by using this command that includes the name of deployment state:-
zappa deploy production
This will create an s3 bucket, API gateway & it will deploy our application in AWS lambda automatically. Once your application is deployed you will get an API Gateway URL.
After deploying the flask application if you want to update for changes than execute the following command
zappa update production
[Note: After deployment if application is not working then add above url before
/image_gatway in ajax url field as follow:
url:’url-you-got-after-deployment/image_gatway ‘]
9. Wrapping Up:-
To all my readers we hope that it was fun learning and experimenting with AWS REKOGNITION TEXT IN IMAGE service, Open-CV and Flask with Python and finally designing the KEYBOARD-LESS KYC system by just simply scanning the Image of AADHAR-CARD. The purpose of this tutorial is to serve you with easy learning to design such small new system so that you can also come up with new ideas and design more innovative systems and share your knowledge to others as well. Thank you for reading!!! Your Suggestions, reviews, and corrections are always welcome.